A FRENCH DRAIN MAY FIX YOUR
BASEMENT WATER PROBLEMS.
Wet basements are a very common problem, particularly in low-lying areas, mountainous terrain, and other places with a high water table. This means that the ground water level has risen up to its high point for the year due to melting snow, spring rains, lack plant roots to absorb water, and short winter days that don’t warm the soil. Expansive soils like clay can swell with water, keeping the water table high for extended periods. Porous soils including sands and gravels drain water quickly, but often have high springtime water tables, especially in low areas, from springtime runoff.
Unfortunately, many homes are built with inadequate protection from groundwater. Even when site conditions are well suited for a simple and cost effective drainage system, contractors often ignore low-cost moisture management. Water problems discovered after a house is built are very difficult and expensive to remedy. If left unchecked, structural and health-related problems may persist. Excessive moisture results in a musty smell and damage to carpet and wood flooring materials. Worse, it promotes growth of mold spores. Even small colonies of mold can cause asthma and other severe health issues. To combat mold, the use of vapor barriers under concrete slabs and proper drainage techniques are essential to keeping your home dry year-round.
CALL US TODAY
201-258-4540WANT TO LEARN MORE ABOUT FRENCH DRAINS?
SCROLL DOWN
HOW DOES A FRENCH DRAIN OR PERIMETER DRAIN WORK?
In many situations, it is possible to drain water away from most foundations and basements by gravity rather than by pumping. The traditional method specifies a perimeter drain around the outside of a building during its construction. The drain outlet slopes downhill away from the house until it reaches the surface of the ground where it can freely discharge by gravity flow. The advantage of this method over pumping water out of a sump is that it lowers the water table around the house, preventing water from ever reaching the cellar in the first place.
In many instances where experts have been asked to troubleshoot wet basement problems, 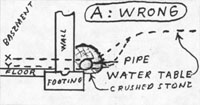 a common finding is that drain pipes were installed above the foundation footing, which allows water to rise to the level of the floor.
(Figure A, level Y).
If the builder made the additional mistake of installing the drain pipe with the weep holes facing up, then the level of water has to rise to the top of the pipe (level X) before the pipe can pick up any water. Other times there is little or no porous bedding material, and pipe inlet holes can become plugged. Another problem occurs with large bedding stone. Migration of the original soil into the bedding plugs up the stone, leading to failure. Often a combination of problems may coexist.
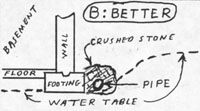 Conventional perimeter drains are usually constructed as shown in Figure B with 4″ pipe laid at the base of the footing. Most contractors use 1 1/2″ crushed stone around the outside of PVC or thinwall perforated septic system pipe which has 1/2″ or 5/8″ holes every few inches. Usually this is entirely satisfactory, though in some cases capillary action (wicking) within the soil can make the basement floor damp even though it is a few inches above the artificially lowered water table.
Due to the severe conditions encountered when building a home several years ago, the following example illustrates an improved method. Just assite work started, the property was deluged with rain. The rain aggravated an already difficult groundwater situation, threatening postponement of construction. However, with patience (and a good pair of rubber boots), perimeter drains were installed four feet outside of where the house was to be located. Within days of installing the drains, excavation for the basement was able to proceed as if it were a dry summer.
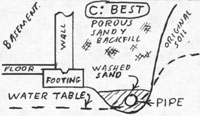
The home is built into the ground about six feet deep on a gently sloping hill. Several years have since passed and the home has never been bothered by moisture in the basement. This is in spite of the original springtime water table just two feet below the surface of the ground. Figure C shows how the drains were installed. This same procedure is excellent for drying out existing wet basements where conditions permit.
Ensuring Effective Drainage
The first consideration is setting the drain pipe deep enough to lower the water table well below the floor in order to reduce the effects of capillary action (wicking). Another way to reduce this effect — generally limited to new construction — is to install a layer of crushed stone entirely under the basement floor. Water cannot “wick” through this coarse aggregate. Although this is more costly, it is good insurance for a dry basement.
Alternatively, installing the drain pipe a little lower may be a very cost-effective alternative, assuming there is sufficient side hill grade to ensure gravity discharge well away from the structure. For new construction and retrofit situations, place the drain pipe a foot or more lower than the footing whenever possible and far enough away to avoid undermining the foundation. Generally 2′ to 4′ or even more is necessary to protect landscaping or porches and similar structures.
Bedding Material
To prohibit 1½” stone from silting up, the stone should be wrapped in filter fabric to hold back the original soil. Water still passes through the fabric but the soil stays in place. Better yet, use a different bedding material that readily passes water but is considerably less expensive. Washed concrete sand, the coarser the better, allows water to flow through readily but keeps the trench more stable than stone while reducing silt buildup in the system. I’ve used it for 25 years in all but the wettest conditions (where I occasionally use ¾” stone wrapped in fabric) with outstanding results and no call backs. This technique requires using pipe with smaller holes since the half inch or larger holes in standard perforated pipe will not hold sand out.
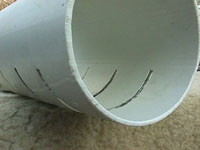
Since no one makes pipe with 5/16″ holes like they used to 25 years ago, you can produce your own slotted pipe by setting a radial arm saw about 3″ above the table and slicing through ¼ the depth of solid pipe every two to three inches or so. Wear goggles to prevent flying chips of hot plastic from striking your eyes. Use either rigid polyethylene or good quality PVC pipe that resists shattering when the saw blade passes through. The 1/8″ slots that result seem to let in water just fine and yet keep the concrete sand from entering the pipe. Pipe is installed with the slots facing down or turned slightly toward the direction of incoming water
